Install E-Commerce B2B Add-on as an Extension
Microsoft Corp. introduced Extensions with the release of Dynamics NAV 2016. Extensions provide the way of implementing add-on or customized functionality to Dynamics NAV without the need to change the base application objects and code, which provides great flexibiliy of extending NAV as well as numerous benefits in the long run, like the ease of upgrading base Dynamics NAV and any Extensions without the extensive and error-prone code merge involved.
Installing Extension packages can be done by IT administrators, and do not require development effort on the partner's behalf. Additionally, Extension management can be performed using end-customer license file that includes the respective Add-on solutions, and does not require partner's development license.
E-Commerce B2B is available as a NAV Extension package, and the installation involves the following procedure.
Step 1 - Copy the Extension to Dynamics NAV Server
Upon licensing E-Commerce B2B, Select Solutions will deliver you the ecm-version.navx file, where the version part corresponds the latest stable release of E-Commerce B2B. This is the Extension package that needs to be installed on the Dynamics NAV Server, and as the first step of having it installed, you should copy the file onto your Dynamics NAV Server machine.
Let's assume you have copied the .navx package at the following location on your Dynamics NAV Server machine
C:\Install\ecm-version.navx
Step 2 - Start Dynamics NAV Development Shell
On your Dynamics NAV Server, start the application Dynamics NAV 2016 Development Shell. The Development Shell is installed by default along with Dynamics NAV, and it essentially opens a Windows PowerShell window with the Dynamics NAV development tools module loaded. The application output should be similar to the image below.

Step 3 - Publish the Extension to the system
You need to “publish” the Extension package to your Dynamics NAV Server. Type the following command on the command line prompt.
Publish-NAVApp -ServerInstance DynamicsNAV90 -Path "C:\Install\ecm-version.navx"
Upon publishing, the NAV Server will use the Extension package to work out any new functionality that is introduced with the package, “merge” the package into the existing Dynamics NAV functionality, and compile the merged functionality to ensure it can be enabled at the next stage. Should any error conditions occur that would prevent to “merge” properly, the command will fail with error details.
After successfully publishing the Extension, you can optionally verify the installation by typing the following command.
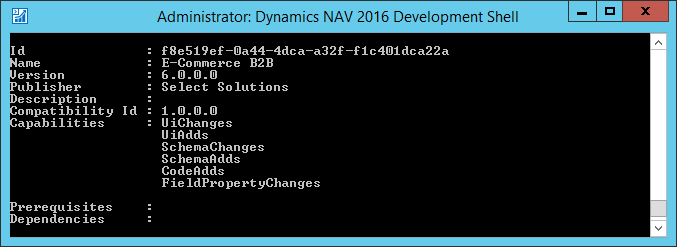
Get-NavAppInfo -ServerInstance DynamicsNAV90
Dynamics NAV will display all the Extensions published, and E-Commerce B2B should be displayed among the Extensions like illustrated.

Step 4 - Install the Extension for the Tenant
Once successfully published, the Extension must be enabled for the Dynamics NAV tenant. Type the following on the command line.
Install-NAVApp -ServerInstance DynamicsNAV90 -Tenant default -Name "E-Commerce B2B"
If you are running a multi-tenant installation, use the particular tenant names instead of default, and repeat the command for each tenant that is provided with E-Commerce B2B functionality.
At this point, you have successfully installed E-Commerce B2B Add-on module as an Extension.
Uninstalling the Extension
Extensions in Dynamics NAV can be uninstalled using the same tools as used for installation, and involves the following steps.
Step 1: Start Dynamics NAV Development Shell
The system will open the Windows PowerShell window with the appropriate modules loaded.
Step 2: Remove the Extension from the Tenant
Type the following command on the command line prompt.
Uninstall-NAVApp -ServerInstance DynamicsNAV90 -Tenant default -Name 'E-Commerce B2B'
or
Uninstall-NAVApp -ServerInstance DynamicsNAV90 -Tenant default -Name 'E-Commerce B2B' -DoNotSaveData
The -DoNotSaveData option instructs the system to also remove any data that may have been entered in Extension tables and fields, like Web Category Structure, Item Features and other E-Commerce related data. Use -DoNotSaveData only if you are removing E-Commerce B2B without the intent to reinstall or upgrade the module, and are certain that E-Commerce data can be safely discarded.
If you are running a multi-tenant installation, use the particular tenant names instead of default, and repeat the command for each tenant that is provided with E-Commerce B2B functionality.
Step 3 - Unpublish the Extension from the system
Type the following command to completely remove the Extension from your Dynamics NAV.
Unpublish-NAVApp -ServerInstance DynamicsNAV90 -Name 'E-Commerce B2B'
This will remove any functionality modifications introduced by E-Commerce B2B.
Upgrading the Extension
If you have installed E-Commerce B2B Add-on module as an extension, you can easily upgrade it to newer versions released by Select Solutions.
Upgrading the Extension is basically the matter of:
- Uninstalling the Extension without the -DoNotSaveData option (both Uninstall and Unpublish)
- Re-installing the Extension using the new ecm-version.navx file
Uninstalling the Extension without the -DoNotSaveData option will preserve any E-Commerce related data in Dynamics NAV database, and once the new version is installed, E-Commerce B2B will automatically restore the original data and also handle the data upgrade procedures, e.g. moving data from one place to another according to the functionality changes between the versions.
Please see above for instructions on how to uninstall and re-install the Extension package.